Setting up
Prerequisites
-
JDK 9 or later
-
IntelliJ IDE
Importing the project into IntelliJ
-
Open IntelliJ (if you are not in the welcome screen, click
File>Close Projectto close the existing project dialog first) -
Set up the correct JDK version
-
Click
Configure>Project Defaults>Project Structure -
If JDK 9 is listed in the drop down, select it. If it is not, click
New…and select the directory where you installed JDK 9 -
Click
OK
-
-
Click
Import Project -
Locate the
build.gradlefile and select it. ClickOK -
Click
Open as Project -
Click
OKto accept the default settings -
Run the
seedu.addressbook.Mainclass (right-click theMainclass and clickRun Main.main()) and try executing a few commands -
Run all the tests (right-click the
testfolder, and clickRun 'All Tests') and ensure that they pass -
Open the
StorageFilefile and check for any code errors-
Due to an ongoing issue with some of the newer versions of IntelliJ, code errors may be detected even if the project can be built and run successfully
-
To resolve this, place your cursor over any of the code section highlighted in red. Press ALT+ENTER, and select
Add '--add-modules=java.xml.bind' to module compiler options
-
Design
Architecture
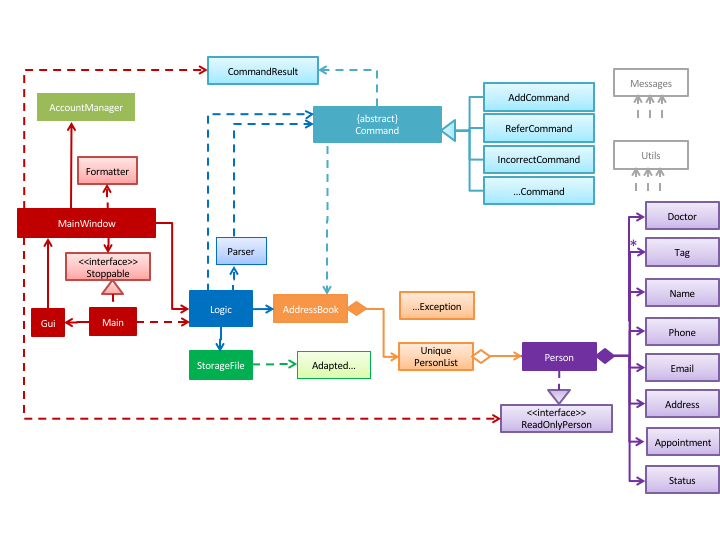
The Architecture Diagram given above shows a detailed overview of how each class is related/ interacts with each other in the design of our project.
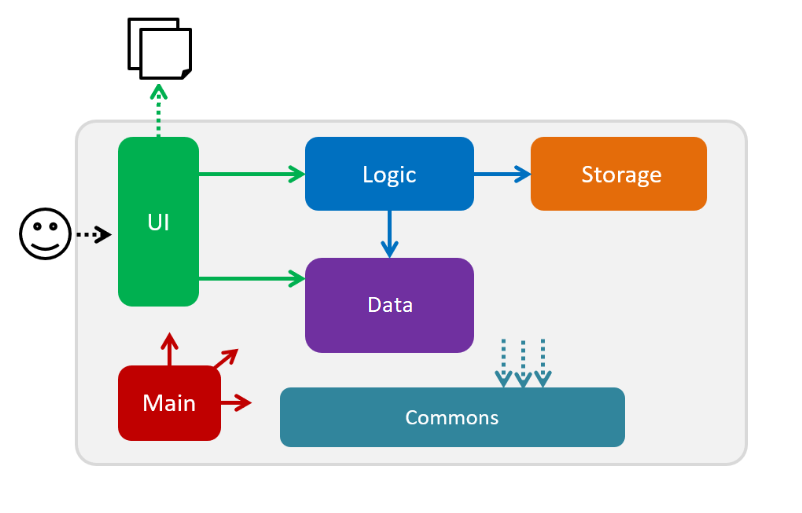
The Simplified Architecture Diagram above is an abstraction of the first diagram provided. It categorises classes into the respective components by colour. Given below is a quick overview of each component.
Main has only one class called Main. It is responsible for,
-
At app launch: Initializing the components, and creating the GUI.
-
At shut down: Shutting down the components, closing the GUI and exiting the program.
The rest of the App consists of the following eight components:
-
AccountManager: Manages the logging in / out of user accounts. -
Command: represents a collection of classes that defines the behaviour of the respective commands. -
Commonsrepresents a collection of classes used by multiple other components. -
Data: Holds the data of the App in-memory. -
Logic: The command executor. -
Parser: Parses user input. -
Storage: Reads data from, and writes data to, the hard disk. -
Ui: The UI of the App.
How the architecture components interact with each other
The Sequence Diagram below shows how the components interact with each other for the scenario where the user issues the command delete 1.
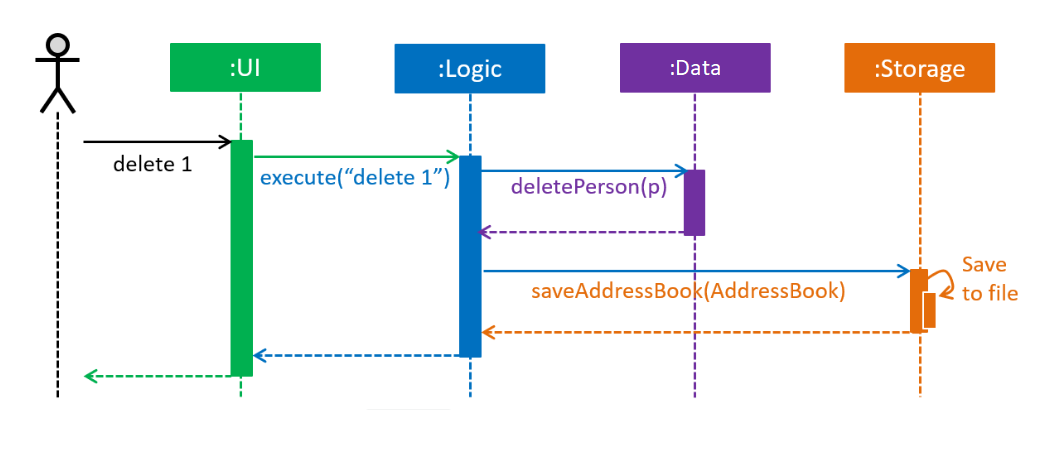
delete 1 commandThe sections below give more details of each component.
AccountManager Component
API : AccountManager
For detailed implementation for AccountManager Component, please refer to Implementation
Data Component
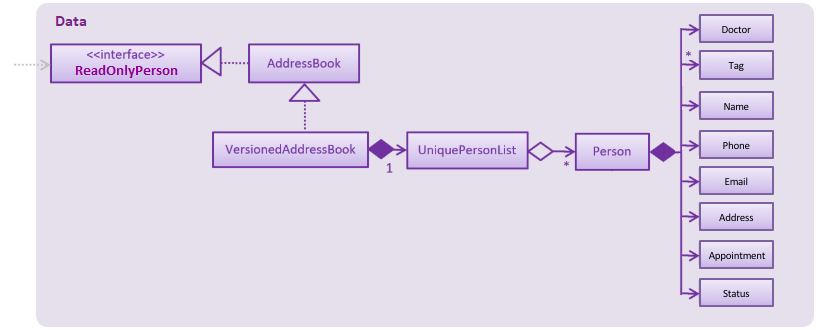
API : AddressBook.java
The AddressBook.java,
-
stores the Address Book data.
-
exposes an unmodifiable
ReadOnlyPerson<Person>that can be 'read' e.g. the UI can be bound to this list so that the UI automatically updates when the data in the list change.
Logic Component
API : Logic.java
-
Logicuses theParserclass to parse the user command. -
This results in a
Commandobject which is executed by the matching Command class (e.g. DeleteCommand class exceutes delete). -
The command execution can affect the
UniquePersonList(e.g. deleting a person). -
The result of the command execution is encapsulated as a
CommandResultobject which is passed back to theUi. -
In addition, the
CommandResultobject can also instruct theUito perform certain actions, such as displaying help to the user.
Given below is the Sequence Diagram for interactions within the Logic component for the execute("delete 1") API call.
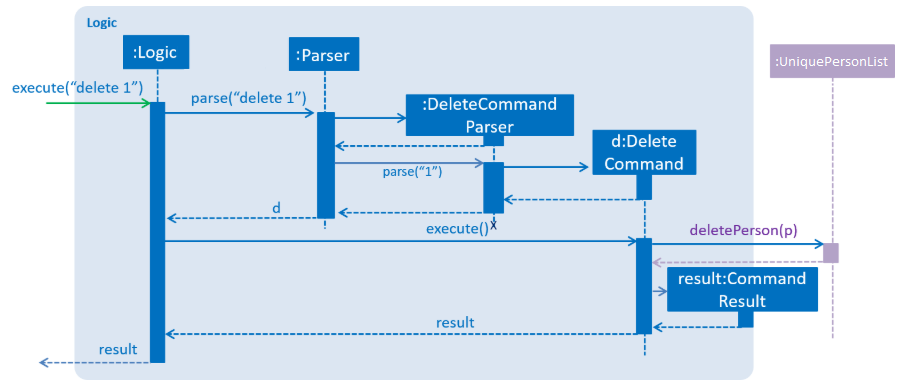
Parser Component
delete 1 CommandAPI : Parser.java
Storage Component
API : StorageFile.java
The Storage component,
-
can save the Address Book data in a default .txt file named addressbook.txt and read it back.
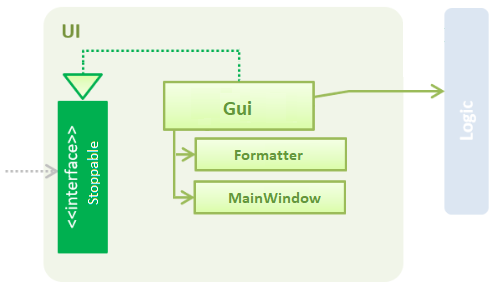
Ui Component
API : Gui.java
The Gui.java component,
-
Executes user commands using the
Logiccomponent. -
Listens for changes to
Datacomponent so that the UI can be updated with the modified data.
Command classes
API : Commands
Classes in this component defines the behaviour of the respective commands. Examples include the SortCommand, ReferCommand, IncorrectCommand class etc, as well as the CommandResult class.
Common classes
API : Common
Classes used by multiple components are in the seedu.addressbook.commons package. In our project, Messages class and Utils class are the only two classes in this package.
Testing
Running Tests
There are two ways to run tests.
Method 1: Using IntelliJ JUnit test runner
-
To run all tests, right-click on the
src/test/javafolder and chooseRun 'All Tests' -
To run a subset of tests, you can right-click on a test package, test class, or a test and choose
Run 'ABC'
Method 2: Using Gradle
-
Open a console and run the command
gradlew clean allTests(Mac/Linux:./gradlew clean allTests)
Types of tests
-
Non-GUI Tests - These are tests not involving the GUI. They include,
-
Unit tests targeting the lowest level methods/classes.
e.g.seedu.addressbook.common.UtilsTest -
Integration tests that are checking the integration of multiple code units (those code units are assumed to be working).
e.g.seedu.addressbook.storage.StorageFileTest -
Hybrids of unit and integration tests. These test are checking multiple code units as well as how the are connected together.
e.g.seedu.addressbook.logic.LogicTest
-
Implementation
This section describes some noteworthy details on how certain features are implemented.
Sort feature
Current Implementation
The sort mechanism is facilitated by UniquePersonList and SortCommand. UniquePersonList stores a list of all persons in the address book as an internalList. Additionally, it implements the following operations:
-
UniquePersonList#SortByName()— SortinternalListby name column in alphabetical order -
SortCommand#getPersonsSortedByDate()— Return a list sorted by appointment column in chronological order -
SortCommand#getPersonsSortedByStatus()— Return a list sorted by status column according to the degree of urgency. The sequence of the status in this order is as follows: Critical, Waiting for Surgery, Life Support, Waiting for doctor appointment, Therapy and Observation.
These operations are exposed in AddressBook as AddressBook#sorted(String attribute). Corresponding operation will be called depending on attribute the user wants to sort the list by.
Given below is two examples usage scenario and how the sort mechanism behaves at each step.
Example 1:
Step 1. The user launches the application for the first time. The UniquePersonList will be initialized with the initial address book state.
Step 2. The user executes add n/… to add some new people. These people will be added sequentially to the end of the list.
Step 3. The user then decides to execute the command list. Commands that do not modify the address book, such as list, will usually not call AddressBook#sorted(String attribute) . Thus, the internalList remains unchanged.
Step 4. The user decides to view the list sorted by their name by executing the sort name command. This command will call AddressBook#sorted(String attribute) and pass the string “name” to the method. Since the value of parameter is “name”, SortByName() will be called. internalList will then be sorted by name column in alphabetical order. At last, internalList will be returned and displayed to the user.
Example 2:
Step 1. The user launches the application for the first time. The UniquePersonList will be initialized with the initial address book state.
Step 2. The user executes add n/… to add some new people. These people will be added sequentially to the end of the list.
Step 3. The user then decides to execute the command list. Commands that do not modify the address book, such as list, will usually not call AddressBook#sorted(String attribute) . Thus, the internalList remains unchanged.
Step 4. The user decides to view the list sorted by their name by executing the sort appointment command. This command will call SortCommand#execute() and pass the string “appointment” to the method. Since the value of parameter is “appointment”, SortCommand#getPersonsSortedByDate() will be called. A list sorted by appointment column in chronological order will be returned and displayed to the user.
Add Status feature
Current Implementation
the add status feature facilitated by the Status class, it implements the following operations:
-
status(String)— The constructor for the classStatus. -
toString()— Returns a String containing the name of the patient’s status. -
isValidStatus()— Checks if if a given string is a valid status. -
equals(Object)— Checks if two patients' status are equal. -
isCorrectStatus()— Checks if if a given string is any of following status: Critical / Waiting for Surgery / Life Support / Waiting for doctor appointment / Therapy / Observation.
In addition to the Appointment class, we update the ReadOnlyPerson interface and the Person class (which implements the interface) to ensure that every Person object is constructed with an Appointment class. To be specific, the following operations are added or updated.
-
Person(Status status)— The classPersonnow requires a Status object during its construction. -
getStatus()— The classPersonimplements a method that returns the Status object of a Person.
Refer feature
Current Implementation
The refer feature is facilitated by the ReferCommand class, Logic class, Parser class and AddressBook class, and it implements the following operations:
-
prepareRefer()— checks if input is valid and splits it at the specific prefix d/ when necessary -
getPatientToRefer()— looks up addressbook and returns target patient to refer -
toRefer = new Person(
person.getName(),
person.getPhone(),
person.getEmail(),
person.getAddress(),
person.getAppointment(),
new Doctor(referraldoctor),
person.getStatus(),
person.getTags()
);
— Copies and modifies taget patient’s doctor name -
tagSet.add(new Tag("referred"))— adds a refer tag -
addressBook.removePerson(person)— removes target patient -
addressBook.addPerson(toRefer)— adds the newly update patient entry back into the addressbook
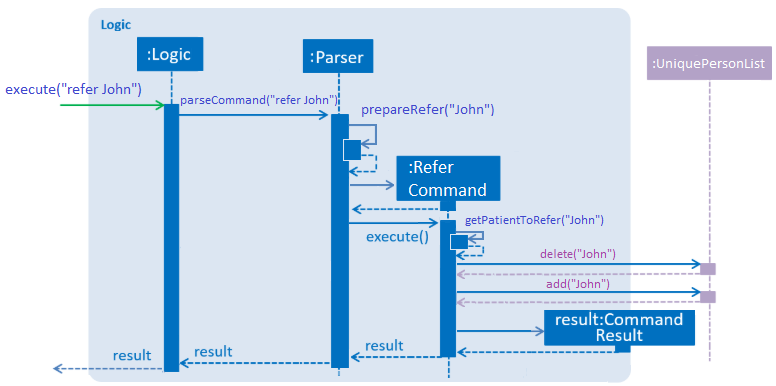
Given below is an example usage scenario and how the refer feature is incorporated at each step. The Sequence Diagram for referring a patient is being provided at the end to further aid in illustrating this example.
Step 1. The user executes command "refer john"
Step 2.Logic class calls Parser class through command parserCommand("refer John")
Step 3. Parser class calls method prepareRefer("John") to checks if input is valid and splits it at the specific prefix d/ when necessary.
Step 4. Parser class calls ReferCommand to start evoke the refer.
Step 5. ReferComand class calls method getPatientToRefer("John") to looks through the Addressbook for all entries containing the keyword "john"
Step 6. If there is only one entry, ReferCommand modifies the entry’s Doctor and adds a new tag 'refer' to the current collection of tags, deletes the old and adds the newly modified patient entry into the addressbook. If there are multiple entires, ReferCommand class prints all entries in the address book with the keyword and prompts user to key unique keyword (Repeats to Step 1).
Step7. The successful execution returns a MESSAGE_SUCCESS along with the patient’s updated particulars.
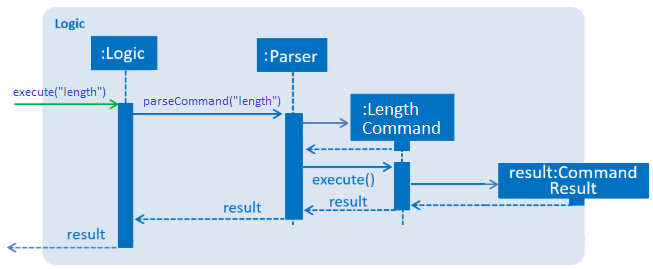
Length feature
Current Implementation
The refer feature is facilitated by the LengthCommand class, Logic class, Parser class and AddressBook class, and it implements the following operation:
-
addressBook.size()— queries and returns the size of the addressbook
Given below is an example usage scenario and how the length feature is incorporated at each step. The Sequence Diagram for getting addressbook length is being provided at the end to further aid in illustrating this example.
Step 1. The user executes command "length"
Step 2.Logic class calls Parser class through command parserCommand("length")
Step 3. Parser class calls LengthCommand to query the size of addressbook.
Step 4. The successful execution returns the length of the address book.
Login/Register/Logout Feature
Current Implementation
The login/register/logout mechanism is facilitated by AccountManager, it implements the following operations:
-
AccountManager()— The constructor for the classAccountManager. -
getLoginStatus()— Returns the login status to the caller. -
getCurrentAccount()— Returns the username of the account currently using the application. -
accountCommandHandler(String)— Handles the user input, checks if there is a match for username and password match if the user’s command islogin, trys to regster a new account if the user’s command isregister, returns a string to indicate the outcome. -
loadAccounts()— Loads all the account information from local storage. -
storeAccounts()— Stores all the account information to local storage. -
logout()— Logs the user out of the system. -
setLoginStatus(boolean)-- Sets the login status according to the parameter. -
register(String, String)— Creates a new account for user. -
weakPassword(String)— Check if the password contains at least one lowercase letter, one uppercase letter and one digit. -
doesNotContainDigit(String)— Check if the string contains digit, works as a utility function for weakPassword(String).
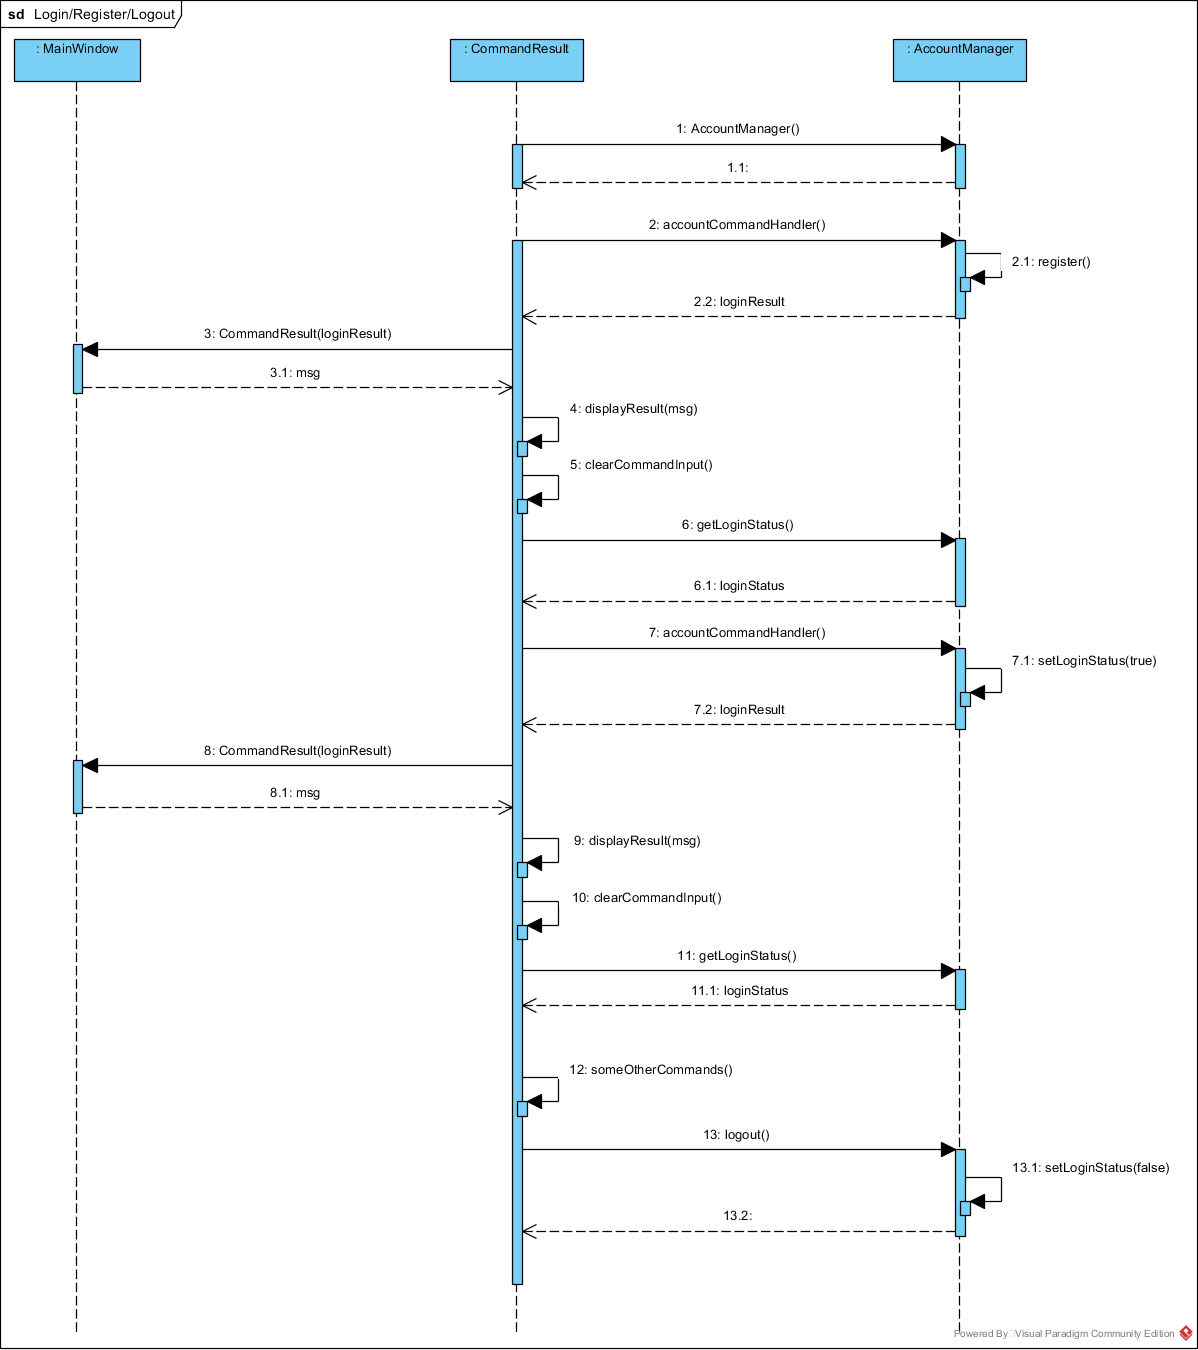
Given below is an example usage scenario and how the login/register/logout mechanism behaves at each step.
Step 1. The user launches the application. The AccountManager will be initialized, loadAccounts will be called to load all the accounts to a HashMap from local storage, the HashMap is used to keep track of all the account information.
Step2. The user executes register Doe Doe123 command to register a new account with username Doe and password Doe123. The new username and the corresponding password will be temporarily put into the HashMap.
Step3. The user executes login Doe Doe123 command to login to the system, if the login is successful, setLoginStatus will be called to set the login status accordingly, and the user will then be able to start using the addressbook.
Step4. The user executes some other commands.
Step5. The user executes logout command, setLoginStatus will be called to set the login status accordingly, and the user will be directed back to the login page.
Step6. The user terminates the program, storeAccounts will be called to store all the account information in the HashMap to the local storage.
The following sequence diagram shows how the login/register/logout mechanism works:
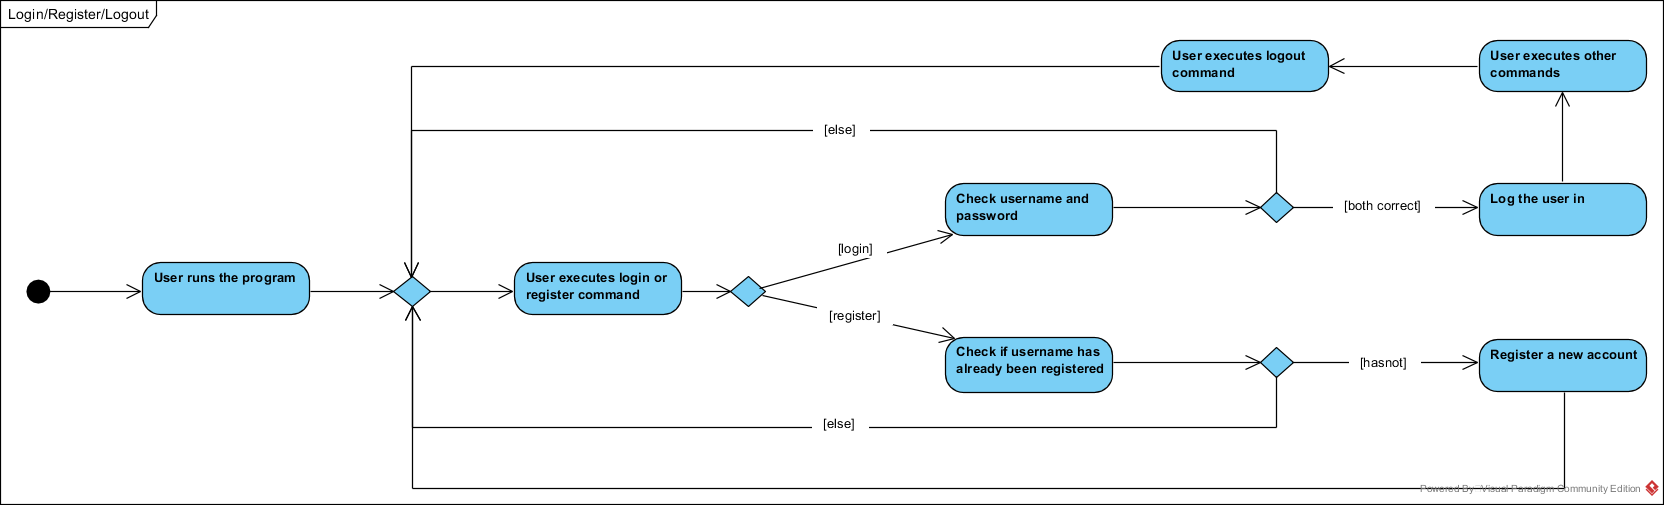
The following activity diagram explains the behaviour of the system during the execution of login/register/logout command.
Design Considerations
Aspect: Data structure to keep account information during runtime
-
Alternative 1 (current choice): Use a HashMap to keep the username password pairs.
-
Pros: Higher performance, O(1) for most of the operations.
-
Cons: Larger memory overhead.
-
-
Alternative 2: Use a TreeMap to keep the username password pairs.
-
Pros: Lower performance, O(log(n)) for most of the operations.
-
Cons: Less memory overhead.
-
HashMap is used because memory is not a serious issue for this program as the program is not memory consuming in nature.
Aspect: File format to keep account information in local storage
-
Alternative 1 (current choice): Use a Java Properties file to store the username password pairs .
-
Pros: High readability, easy to implement as it only requires java.util package to work, small in file size.
-
Cons: Does not support hierarchical data structure well.
-
-
Alternative 2: Use a JSON file to store the username password pairs .
-
Pros: Key-vaule pair format, similar to HashMap.
-
Cons: Large in file size.
-
-
Alternative 3: Use a CSV file to store the username password pairs.
-
Pros: Small in file size.
-
Cons: Complicated to convert to/from HashMap.
-
-
Alternative 4: Use a XML file to store the username password pairs
-
Pros: Compatible with HashMap.
-
Cons: Large in file size.
-
Add Doctor feature
Current Implementation
the add doctor feature facilitated by the Doctor class, it implements the following operations:
-
Doctor(String)— The constructor for the classDoctor. -
toString()— Returns a String containing the name of the patient’s doctor. -
isValidName()— Checks if the date is alphanumeric. -
equals(Object)— Checks if two patients' doctors are equal.
In addition to the Appointment class, we update the ReadOnlyPerson interface and the Person class (which implements the interface) to ensure that every Person object is constructed with an Appointment class. To be specific, the following operations are added or updated.
-
Person(Doctor doctor)— The classPersonnow requires a Doctor object during its construction. -
getDoctor()— The classPersonimplements a method that returns the Doctor object of a Person. -
getAsTextShowAll()— This operation is updated to allow a person’s doctor to be printed when an addresbook’s lastShownList is printed onto the UI.
The example usage scenario is similar to the scenario of the Add appointment feature below.
Add Appointment feature
Current Implementation
the add appointment feature is facilitated by the Appointment class, it implements the following operations:
-
Appointment(String)— The constructor for the classAppointment. -
toString()— Returns a String containing the date of the appointment. -
isValidDate()— Checks if the date is alphanumeric. -
equals(Object)— Checks if two appointment dates are equal.
In addition to the Appointment class, we update the ReadOnlyPerson interface and the Person class (which implements the interface) to ensure that every Person object is constructed with an Appointment class. To be specific, the following operations are added or updated.
-
Person(Apppointment appointment)— The classPersonnow requires an Appointment object during its construction. -
getAppointment()— The classPersonimplements a method that returns the Appointment object of a Person. -
getAsTextShowAll()— This operation is updated to allow a person’s appointment date to be printed when an addresbook’s lastShownList is printed onto the UI.
Next, the parser is updated to recognize user input corresponding to the Appointment object of a person. It works together with an updated Add Command. When adding a new person through the add command, the user has to write m/APPOINTMENTDATE' to signify the `Appointment portion of a Person.
Given below is an example usage scenario and how the Appointment feature is incorporated at each step.
Step 1. The user executes command Add NAME [p]p/PHONE [p]e/EMAIL [p]a/ADDRESS m/APPOINTMENT [t/TAG]…\n\t"
Step 2. The parser parses the user command, verifying that the APPOINTMENT is of the 24 hour format YYYY MM DD HH MM. Then, it creates the relevant object for Appointment, Address etc, and a new Person object is constructed. The Logic class executes the AddCommand with the prepared arguments.
Step 3. The Addressbook tries to add the new person into the uniquePersonList. But first, the uniquePersonList checks if the new Person object is a duplicate of an existing Person object in the Addressbook. If the Person is not a duplicate, it is added into the Addresbook and the Addressbook is saved. Note that two patients cannot have the same appointment timing with the same doctor.
Step 4. The successful execution returns a MESSAGE_SUCCESS along with the added person. The MainWindow displays the result and prints the added person into the GUI.
DoctorAppointments feature
Current Implementation
This is a new feature, that is executed as appointment DOCTORNAME. It finds all Persons in the addressbook that are assigned to a doctor with the same name as DOCTORNAME. Then, it prints out a list of them sorted according to Appointment dates. The first person from the top has the earliest appointment date. Let us split the implementation documentation into two parts. (1) Returning a list of persons corresponding to the user input’s name of the doctor in chronological order. (2)Printing only the relevant information of these persons in a neat manner similar to a time-table.
For the first part, finding and sorting the list of corresponding persons is facilitated by the DoctorAppointmentsCommand class and the Person class. The following operations are implemented in the DoctorAppointmentsCommand class.
-
execute()— Upon execution, a newIndicatorclass stores information indicating thatDoctorAppointmentsCommandis the most recently invoked command. Then, the following methodgetPersonsWithName(doctor)is called. -
getPersonsWithName(doctor)— This method is adapted from theFindCommandclass method. In addition to the original command, this method utilizes the package on LocalDate and Collections.Sort. This method updates aLocalDateTimefield in aPersonobject (to be explained in the next paragraph). This method also calls SortDate() which is a separate sorting class that helps to compareLocalDatedates and sort them based on chronological order. This method returns an ArrayList of Persons that have the doctor’s name corresponding to the user input’s doctor. The ArrayList is sorted based on their appointment dates.
We update the Person class to contain an additional field LocalDateTime date which is originally set to null for every person in the addressbook. Then the following getters and setters are implemented in the Person class and their method signatures are updated in the ReadOnlyPerson interface.
-
getLocalDateTime() -
setLocalDateTime()
Given below is an example usage scenario and how the Persons corresponding to a certain doctor are sorted and listed in Chronological order.
Step 1. The user executes command appointment DOCTORNAME"
Step 2. The parser parses the command and prepares the keyword arguments for the DoctorAppointmentsCommand class.
Step 3. DoctorAppointmentsCommand is executed and the Indicator class records that this is the most recently invoked command. The execute command calls getPersonsWithName(doctor). For each Person in the existing addressbook, if the Person’s doctor corresponds to DOCTORNAME, the LocalDateTime class parses the person’s appointment date, and the Person’s LocalDateTime date field is set to be the parsed appointment date.
Step 4. The person is added into the matchedPersons list.
Step 5. The list of matchedPersons are sorted based on the LocaldateTime date field in each person.
Step 6. The sorted list of matchedPersons are returned and displayed in a table format (explained in second part)
For the second part of the implementation, we discuss how the list of matchedPersons is formatted to print in a certain manner. To facilitate the printing, we mainly update the format() method of the UI Formatter class.
To facilitate the update, a new Indicator class is created and a new method is implemented in the ReadonlyPerson interface.
-
Indicator.setLastCommand(String)--when called, stores a String that records the last invoked user Command. -
Indicator.getLastCommand()--when called, provides information on the last invoked user Command. -
getAsTextNameDateDoctor()--This is a method of theReadOnlyPersoninterface. It is a new String builder that builds a String of information about the Person. The information contains only the name and appointment date of the person. The String is padded on the right with whitespace to ensure a tabular format.
The UI Formatter is updated in the following way.
-
format(Persons)--Checks if the last invoked user Command is theDoctorAppointmentsCommand. If it is, calls the new String builder methodgetAsTextNameDateDoctor()for each Person to be formatted.
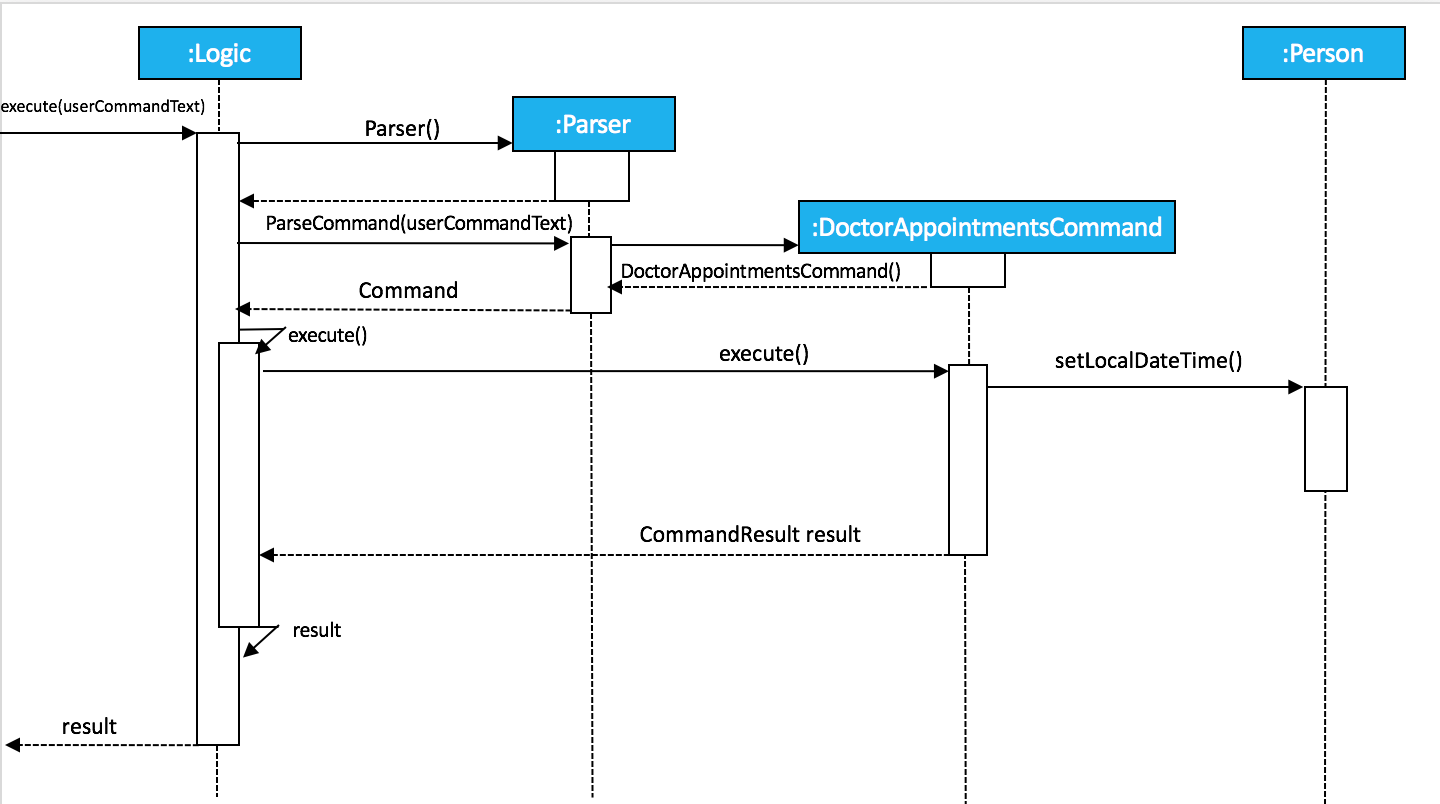
Given below is an example usage scenario and the formatter formats the Person to be printed in a tabular format. It continues from Step 6 above.
Step 7. When the display method is called in step 6, the format method in Formatter is called.
Step 8. A separate String builder method getAsTextNameDateDoctor() is called, and the String is padded on the right by whitespace.
Step 9. The MainWindow displays the newly formatted Persons in neat rows, displaying only the relevant information on Name and Appointment Date.
The sequence diagram below shows the interactions between the various classes when the appointment DOCTOR command is executed.
ApptDate feature
Current Implementation
This feature displays a doctor’s appointment timetable for a specific day.
This is a new feature, that is executed as apptDate DOCTORNAME m/YYYY MM DD.
When the parser parses the user command that starts with the apptDate commandword, it instantiates an object of the class ApptDate.
The user specfied date and doctor’s name are stored as static fields in the class.
Next, the logic class calls this object to be executed.
The method execute() is similar in implementation to the execute() method of the previous appointment feature.
In summary, the execute() method calls the method getPersonsWithSameDoctorSameDate().
getPersonsWithSameDoctorSameDate() finds all Persons in the addressbook that have the same doctor as the user’s specified doctor.
Then, it traverses the lists of matchedPersons to select only the Persons that have the same appointment date as the user specified date that is of the format YYYY MM DD.
Then, it returns a matchedPersonsList that is used for the Command Result and for the last shown list.
At the same time, we build a long string called timetable. This formatting of this string is tedious.
Some methods involve padding of whitespaces and printing out time-slots of 15min starting from 6am.
If anyone is confused by the 'for' loop, the iterator 'i' signifies the number of minutes that have elapsed since 00:00 hours of that day.
We convert the appointment time of each matchedPerson into the number of minutes from 00:00.
If the iterator 'i' matches the appointment timing of a Person, we print out the Person beside that time-slot.
The UI Formatter facilitates the printing of timetable.
-
format(Persons)--Checks if the last invoked user Command is theApptDateCommand. If it is, it retrieves the timetable from theApptDateclass, and prints out the neatly formatted timetable.
Appendix A: Product Scope
Target user profile:
-
hospital doctor who has several long-term patients he/she has to take care of.
-
prefer desktop apps over other types
-
can type fast
-
prefers typing over mouse input
-
is reasonably comfortable using CLI apps
Value proposition:
-
manage contacts faster than a typical mouse/GUI driven app
-
To reduce inefficient communication between patients and doctors, so as to reduce the chances of patients having delays in treatment.
Appendix B: User Stories
Priorities: High (must have) - * * *, Medium (nice to have) - * *, Low (unlikely to have) - *
| Priority | As a … | I want to … | So that I can… |
|---|---|---|---|
|
doctor |
keep track of current and past appointments with patients that I have for the day |
be on time to deliver treatment |
|
doctor |
have a custom-made address book |
filter out the patients that are not affiliated to me |
|
doctor |
sort my patient according to my desired attribute |
prioritize the allocation of my resources |
|
doctor |
have good authentication |
my patients’ data are protected and not easily disclosed |
|
doctor |
be able to directly refer patients to respective specialists |
focus on attending to patients with medical conditions relevant to my expertise, and ensure that others are properly referred to the correct doctor to attend to their specific medical condition(s). |
|
doctor |
print out a list of all patients who have appointments with me |
keep track of my appointments |
|
doctor |
print my timetable of appointments neatly |
manage my appointment more conveniently |
|
doctor |
track the status of all my patients |
know the stage of treatment in which the patient is undergoing |
|
doctor |
indicate my patients' appointment date when I add him/her into addressbook |
keep track of their appointment date |
Appendix C: Use Cases
(For all use cases below, the System is the AddressBook and the Actor is the user, unless specified otherwise)
Use case: UC01 - Login
Main success scenario:
-
The user opens the addressbook
-
Addressbook prompts’ user for username and password
-
The user inputs the username/password and hits enter
-
Addresbook authenticates the user and displays welcome address
Use case ends.
Use case: UC02 - Sort entries
Main success scenario:
-
User requests to sort the list in address book based on specified attribute.
-
AddressBook sorts and prints out all entries sorted by attribute specified by user.
Use case ends.
Extensions
-
1a. The format entered by the user is incorrect.
-
1a1. AddressBook shows an error message and prints the format for user to follow.
-
1a2. User re-enters new patient’s particulars.
-
-
Steps 1a1 - 1a2 are repeated until the correct format is entered by the user.
Use case resumes at step 2.
Use case: UC03 - Refer patient
Main success scenario:
-
The user requests to refer patient to another doctor.
-
AddressBook finds patient from the list of entries, and extracts all the relevant particulars of the target patient.
-
Addressbook updates the extracted particulars with the new doctor’s name and patient tag.
-
AddressBook deletes the old patient entry from the main list and adds the newly updated one into the main list.
Use case ends.
Extensions
-
1a. The format entered by the user is incorrect.
-
1a1. AddressBook shows an error message and prints the format for user to follow.
-
1a2. User re-enters new patient’s particulars.
-
-
Steps 1a1 - 1a2 are repeated until the correct format is entered by the user.
Use case resumes at step 2.
-
1b. There are multiple entries in the addressbook with the same patient name(s) entered by the user.
-
1b1. AddressBook prints out all similar patient entries and prompts users to to identify the correct patient.
-
1b2. User enters correct patient’s full name.
Use case resumes at step 2.
-
-
1c. The format of the doctor’s name entered by the user is incorrect (non-alphanumeric).
-
1c1. AddressBook shows an error message and reminds users that doctor names can only contain alphanumeric characters.
-
1c2. User enters a valid doctor’s name that follows the condition above.
Use case resumes at step 2.
-
Use case: UC04 - Manage appointments
Main success scenario:
-
The user types a command appointments in the command line
-
The system finds all scheduled appointments and prints them to the screen in chronological order
-
If possible, can print a literal timetable on the screen
-
The expired appointments should be excluded from the timetable if possible
Use case ends.
Use case: UC05 - Add patient
Main success scenario:
-
User adds a patient in the address book.
-
AddressBook adds patient to address book and prints the newly added patient’s details.
Use case ends.
Extensions
-
1a. The format entered by the user is incorrect.
-
1a1. AddressBook shows an error message and prints the format for user to follow.
-
1a2. User re-enters new patient’s particulars.
-
-
Steps 1a1 - 1a2 are repeated until the correct format is entered by the user.
Use case resumes at step 2.
Use case: UC06 - Length of address book
Main success scenario:
-
User requests for length of address book.
-
AddressBook gets the current length and prints out the number of entries.
Use case ends.
Use case: UC07 - List all entries
Main success scenario:
-
User requests for list of address book.
-
AddressBook prints out all entries in the address book with their respective particulars that are not private.
Use case ends.
Use case: UC08 - Find patients
Main success scenario:
-
User requests to find all patients containing any keyword in their name from the list.
-
AddressBook looks through the list and prints out all entries with the keyword specified by user.
Use case ends.
Extensions
-
1a. The format entered by the user is incorrect.
-
1a1. AddressBook shows an error message and prints the format for user to follow.
-
1a2. User re-enters new patient’s particulars.
-
-
Steps 1a1 - 1a2 are repeated until the correct format is entered by the user.
Use case resumes at step 2.
Use case: UC09 - Delete patient
Main success scenario:
-
User requests to list patients
-
AddressBook shows a list of patients
-
User requests to delete a specific patient in the list
-
AddressBook deletes the patient.
Use case ends.
Extensions
-
2a. The list is empty.
Use case ends.
-
3a. The given index is invalid.
-
3a1. AddressBook shows an error message.
Use case resumes at step 2.
-
Use case: UC10 - View patient by index
Main success scenario:
-
User requests to view patient particulars at a certain index in the list.
-
AddressBook prints out patient with his/ her respective particulars that are not private at the specified index.
Use case ends.
Extensions
-
1a. The format entered by the user is incorrect.
-
1a1. AddressBook shows an error message and prints the format for user to follow.
-
1a2. User re-enters new patient’s particulars.
-
-
Steps 1a1 - 1a2 are repeated until the correct format is entered by the user.
Use case resumes at step 2.
Use case: UC11 - View all particulars of a patient by index
Main success scenario:
-
User requests to view patient with ALL particulars at a certain index in the list.
-
AddressBook prints out patient with his/ her respective particulars - including particulars that are private - at the specified index.
Use case ends.
Extensions
-
1a. The format entered by the user is incorrect.
-
1a1. AddressBook shows an error message and prints the format for user to follow.
-
1a2. User re-enters new patient’s particulars.
-
-
Steps 1a1 - 1a2 are repeated until the correct format is entered by the user.
Use case resumes at step 2.
Use case: UC12 - Clear all entries
Main success scenario:
-
User requests for list of address book.
-
AddressBook deletes all entries in the address book.
Use case ends.
Use case: UC13 - Exit
Main success scenario:
-
User requests to exit AddressBook.
-
AddressBook cloese and quits the application.
Use case ends.
Appendix D: Non Functional Requirements
-
Should work on any mainstream OS as long as it has Java 9 or higher installed.
-
Should be able to hold up to 1000 persons.
-
Should come with automated unit tests and open source code.
-
Should favor DOS style commands over Unix-style commands.
Appendix F: Instructions for Manual Testing
Given below are instructions to test the app manually.
| These instructions only provide a starting point for testers to work on; testers are expected to do more exploratory testing. |
Launch and Shutdown
-
Initial launch
-
Download the jar file and copy into an empty folder
-
Double-click the jar file
Expected: Shows the GUI with welcome message. The window size may not be optimum.
-
-
Saving window preferences
-
Resize the window to an optimum size. Move the window to a different location. Close the window.
-
Re-launch the app by double-clicking the jar file.
Expected: The most recent window size and location is retained.
-
Sort feature
-
Prerequisites: Please add some patient entries.
-
Test case 1:
sort name
Expected: Prints out a list of all patients sort by name in lexicographically order. -
Test case 2:
sort status
Expected: Prints out a list of all patients sort by status according to the degree of urgency. -
Test case 3:
sort appointment
Expected: Prints out a list of all patients sort by appointment in chronological order. -
Other incorrect commands to try:
sort,sort abc
Expected: An error message:Invalid command format!is displayed on the screen, with the displays the correct format below.
Add Status feature
-
Prerequisites: The user has logged in to the system.
-
Test case 1:
add John p/98765432 e/john@gmail.com a/John street, block 123, #01-01 m/2019 12 11 12 30 d/DoctorTan s/Observation
Expected: New person added: John Phone: 98765432 Email: john@gmail.com Address: John street, block 123, #01-01 Appointment: 2019 12 11 12 30 Doctor: DoctorTan Status: Observation Tags: -
Test case 2:
add Amy p/98765432 e/john@gmail.com a/John street, block 123, #01-01 m/2019 12 11 12 30 d/DoctorTan s/Waiting for Surgery
Expected: New person added: Amy Phone: 98765432 Email: john@gmail.com Address: John street, block 123, #01-01 Appointment: 2019 12 11 12 30 Doctor: DoctorTan Status: Waiting for Surgery Tags: -
Other incorrect commands to try:
add Sherry p/98765432 e/john@gmail.com a/John street, block 123, #01-01 m/2019 12 11 12 30 d/DoctorTan s/nothing
Expected: An error message: Status should be Observation/ Critical / Waiting for Surgery / Therapy / Life Support / Waiting for doctor appointment
Login/Register/Logout Feature
The username password pair: Admin Admin123 is registered by default for testing purpose. (This is only valid for the user who has cloned our project repository and starts the application using IDE. For the standalone jar file there is no such default account, and user will have to register a new account before starting to use the application.)
|
-
Login
-
Prerequisites: The user has not logged in to the system.
-
Test case:
login Admin Admin321
Expected: An error message:Invalid username or password, please try againis displayed on the screen. -
Test case:
login Admin Admin123
Expected: Login succeed. -
Other incorrect login commands to try:
login,login Admin Admin123 Admin123
Expected: Helping message is displayed on the screen.
-
-
Register
-
Prerequisites: The user has not logged in to the system.
-
Test case:
register newuser 12345
Expected: An error message:The password should contain at least one lowercase letter, one uppercase letter, and one digitis displayed on the screen. -
Test case:
register Admin Password123
Expected: An error message:The username has already been registered, please try a new usernameis displayed on the screen. -
Test case:
register newuser New123
Expected: Registration succeed. -
Other incorrect register commands to try:
register,register Admin Admin123 Admin123
Expected: Helping message is displayed on the screen.
-
-
Logout
-
Prerequisites: The user has already logged in to the system.
-
Test case:
logout
Expected: The user is directed back to the login page. -
Other incorrect logout commands to try:
logout123
Expected: Helping message is displayed on the screen.
-
Refer feature
| Please ensure the following entries have been added into the addressbook before trying the test cases below. If there are not entries in the addressbook, the 'no such person' execption will be shown. |
-
refer NAME [MORE_NAMES]
-
Prerequisites: please add the following patient entries being proceeding:
add John p/98765432 e/john@gmail.com a/John street, block 123, #01-01 m/2019 12 11 12 30 d/DoctorTan s/Observation
add John Doe p/98765432 e/johnd@gmail.com a/JohnD street, block 123, #01-01 m/2019 12 11 12 00 d/DoctorTan s/Observation
add John Teo p/98765432 e/johnt@gmail.com a/JohnT street, block 123, #01-01 m/2019 12 11 11 30 d/DoctorTan s/Observation
add Shawn Tan p/98765432 e/shawnt@gmail.com a/Shawn street, block 123, #01-01 m/2019 12 11 11 00 d/DoctorTan s/Observation
add Shawn Doe p/98765432 e/shawnd@gmail.com a/ShawnD street, block 123, #01-01 m/2019 12 11 10 30 d/DoctorTan s/Observation
add Shawn Teo p/98765432 e/shawnteo@gmail.com a/ShawnT street, block 123, #01-01 m/2019 12 11 10 00 d/DoctorTan s/Observation
add Abigail p/98765432 e/shawnteo@gmail.com a/ShawnT street, block 123, #01-01 m/2019 12 11 09 30 d/DoctorTan s/Observation
add Abigail Doe p/98765432 e/shawnteo@gmail.com a/Abigail street, block 123, #01-01 m/2019 12 11 09 00 d/DoctorTan s/Observation
add Betsy Crowe pp/1234567 e/betsycrowe@gmail.com pa/Crowe Newgate m/2019 11 14 08 30 d/DoctorTan s/Observation
add Betsy Doe pp/1234567 e/betsycrowe@gmail.com pa/Doe Newgate m/2019 11 14 08 00 d/DoctorTan s/Observation -
Test case 1:
refer
Expected: An error message:Invalid command format!is displayed on the screen, with the displays the correct format below. -
Test case 2:
refer Shawn
Expected: Prints out full particulars of all 3 patients with the name ofShawn, followed by a message:3 similar entries have been found. Please re-enter patient’s FULL NAME to referto prompt for a re-entry of the ful name of the target patient. -
Test case 3:
refer Shawn Doe
Expected: Prints out success message:Patient Shawn Doe has been successfully referred to Dr Seuss!! :D, followed by the patient’s updated entry below. -
Test case 4:
refer John
Expected: Prints out success message:Patient John has been successfully referred to Dr Seuss!! :D, followed by the patient’s updated entry below.This is an edge case test. It is a successful refer (unlike test case 2) because there is an entry Johnwithout any last names in this case - this leads to the patient name being an exact and unique match of the keyword inputted unlike test case 2 where everyShawnhas a last name (therefore no patient name == keyword inputted). -
Test case 5:
refer d/Dr Elizabeth p/John
Expected: Prints out success message:Patient John has been successfully referred to Dr Elizabeth!! :D, followed by the patient’s updated entry below. -
Test case 6:
refer Abigail
Expected: Prints out success message:Patient Abigail has been successfully referred to Dr Elizabeth!! :D, followed by the patient’s updated entry below.The default doctor is Dr Seuss. However, once a new doctor of preferrence is introduced (Dr Elizabeth in this case), the new doctor will be the new default foctor for subsequent refer commands that do not specify a change in referral doctor. Please note that it is part of the feature’s design and not a bug :). -
Test case 7:
refer d/Dr. Tan p/Abigail
Expected: Prints outInvalid command format!message followed by a reminder
Doctor’s names should only contain spaces and/or alphanumeric characters

Special characters like . ! @ # , etc are not allowed!

Please re-enter with an appropriate doctor name.
-
Length feature
-
length
-
Prerequisites: NIL
-
Test case 1:
lengthExpected:Length of the address book is: 10The length will be 10 if the 10 test case inputs from the previous section (refer feature) is not cleared. -
Test case 2:
delete 1
lengthExpected:Length of the address book is: 9 -
Test case 3:
clear
lengthExpected:Length of the address book is: 0
-
Add Appointment feature
-
Invalid appointment value
-
Prerequisites: please ensure that the addressbook is cleared. You can do this by the
clearcommand. -
Test case 1:
add John p/98765432 e/john@gmail.com a/John street, block 123, #01-01 m/1800 12 11 12 30 d/DoctorTan s/Observation
Expected: The test case fails because appointments earlier than the current time are not allowed.
Prints outInvalid command format!message followed by a reminder
Appointment timings must not be earlier than current time,

must be in the 24hr format of yyyy MM dd hh mm.

Additionally appointment slots are in blocks of 15min.

Thus, the time in minutes must be 00, 15, 30 or 45. No appointments earlier than 6am. -
Test case 2:
add John p/98765432 e/john@gmail.com a/John street, block 123, #01-01 m/2020 30 d/DoctorTan s/Observation
Expected: The test case fails because it does not follow the 24hr format required.
Prints outInvalid command format!message followed by a reminder
that is similar to that of test case 1. -
Test case 3:
add John p/98765432 e/john@gmail.com a/John street, block 123, #01-01 m/2020 100 11 12 30 d/DoctorTan s/Observation
Expected: The test case fails because 100 is not a valid month value.
Prints outInvalid command format!message followed by a reminder
that is similar to that of test case 1. -
Test case 4:
add John p/98765432 e/john@gmail.com a/John street, block 123, #01-01 m/2020 01 11 01 30 d/DoctorTan s/Observation
Expected: The test case fails because appointments before 6am are not allowed.
Prints outInvalid command format!message followed by a reminder
that is similar to that of test case 1. -
Test case 5:
add John p/98765432 e/john@gmail.com a/John street, block 123, #01-01 m/2020 01 11 08 22 d/DoctorTan s/Observation
Expected: The test case fails because appointments must be in blocks of 15min slots. 22minutes is not allowed.
Prints outInvalid command format!message followed by a reminder
that is similar to that of test case 1.
-
-
Invalid Doctor’s name
-
Prerequisites: please ensure that the addressbook is cleared. You can do this by the
clearcommand. -
Test case 1:
add John p/98765432 e/john@gmail.com a/John street, block 123, #01-01 m/2020 12 11 12 30 d/Docto!Tan s/Observation
Expected: The test case fails because the doctor’s name must be alphanumeric.
Prints outInvalid command format!message followed by a reminder
Doctor’s names should only contain spaces and/or alphanumeric characters

Special characters like . ! @ # , etc are not allowed!

Please re-enter with an appropriate doctor name.
-
-
Same appointment timing with the same doctor
-
Prerequisites: please ensure that the addressbook is cleared. You can do this by the
clearcommand.
Then, add the following person before proceeding.
add John p/98765432 e/john@gmail.com a/John street, block 123, #01-01 m/2020 01 11 08 00 d/DoctorTan s/Observation -
Test case 1:
add Xiao Ming p/98765432 e/john@gmail.com a/John street, block 123, #01-01 m/2020 01 11 08 00 d/DoctorTan s/Observation
Expected: Even though Xiao Ming is a different person, the test case fails because two persons cannot have an appointment with the same doctor at the same time
Prints outThis person already exists in the address book, or another person has the same appointment time
-
-
Same appointment timing with another Person, but different doctor
-
Prerequisites: please ensure that the addressbook is cleared. You can do this by the
clearcommand.
Then, add the following person before proceeding.
add John p/98765432 e/john@gmail.com a/John street, block 123, #01-01 m/2020 01 11 08 00 d/DoctorTan s/Observation -
Test case 1:
add Xiao Ming p/98765432 e/john@gmail.com a/John street, block 123, #01-01 m/2020 01 11 08 00 d/Dr Seuss s/Observation
Expected: The test case succeeds and theNew Person added…message is printed.
-
-
Duplicate person details but different appointment
-
Prerequisites: please ensure that the addressbook is cleared. You can do this by the
clearcommand.
Then, add the following person before proceeding.
add John p/98765432 e/john@gmail.com a/John street, block 123, #01-01 m/2020 01 11 08 00 d/DoctorTan s/Observation -
Test case 1:
add John p/98765432 e/john@gmail.com a/John street, block 123, #01-01 m/2020 01 20 08 00 d/DoctorTan s/Observation
Expected: The test case fails because the person John has the same name, phone and email as an existing person. Prints outThis person already exists in the address book, or another person has the same appointment time
-
-
Successful adding of person
-
Prerequisites: please ensure that the addressbook is cleared. You can do this by the
clearcommand. -
Test case 1:
add Xiao Ming p/98765432 e/john@gmail.com a/John street, block 123, #01-01 m/2020 01 11 08 00 d/Dr Seuss s/Observation
Expected: The test case succeeds and theNew Person added…message is printed.
-
DoctorAppointments feature
-
appointment command
-
Prerequisites: please clear the addressbook and add the following patient entries being proceeding:
add John p/98765432 e/john@gmail.com a/John street, block 123, #01-01 m/2019 12 11 12 30 d/DoctorTan s/Observation
add Xiao ming p/98765432 e/johnd@gmail.com a/JohnD street, block 123, #01-01 m/2019 12 11 12 00 d/doctor tan s/Observation
add kumar p/98765432 e/johnt@gmail.com a/JohnT street, block 123, #01-01 m/2019 12 11 11 30 d/DOCTOR TAN s/Observation
add Shawn Tan p/98765432 e/shawnt@gmail.com a/Shawn street, block 123, #01-01 m/2019 12 11 11 00 d/DoctorTan s/Observation -
Test case 1:
appointment
Expected: Prints outInvalid command format!message followed by a reminder
Parameters: DOCTOR_NAME

Example: appointment DoctorTan. -
Test case 2:
appointment DoctorTan
Expected: A table with header columnsName,DateandDoctor.
Shawn Tan and John should be inside the table. -
Test case 3:
appointment doctor tan
Expected: A table with header columnsName,DateandDoctor.
Xiao ming should be inside the table. -
Test case 4:
appointment DOCTOR TAN
Expected: A table with header columnsName,DateandDoctor.
Kumar should be inside the table.
-
ApptDate feature
-
apptDate command
-
Prerequisites: please clear the addressbook and add the following patient entries being proceeding:
add John p/98765432 e/john@gmail.com a/John street, block 123, #01-01 m/2019 12 11 12 30 d/DoctorTan s/Observation
add Xiao ming p/98765432 e/johnd@gmail.com a/JohnD street, block 123, #01-01 m/2019 12 11 12 00 d/DoctorTan s/Observation
add Shawn Tan p/98765432 e/shawnt@gmail.com a/Shawn street, block 123, #01-01 m/2019 12 11 11 00 d/DoctorTan s/Observation
add kumar p/98765432 e/johnt@gmail.com a/JohnT street, block 123, #01-01 m/2020 12 11 11 30 d/DoctorTan s/Observation -
Test case 1:
apptDate
Expected: Prints outInvalid command format!message followed by a reminder
Parameters: NAME m/APPOINTMENT

Example: appointment DoctorTan. -
Test case 2:
apptDate DoctorTan
Expected: Prints outInvalid command format!message followed by a reminder
Parameters: NAME m/APPOINTMENT

Example: appointment DoctorTan. -
Test case 3:
apptDate DoctorTan m/30November
Expected: Prints outInvalid command format!message followed by a reminder
Dates must be in the 24hr format of yyyy MM dd. -
Test case 4:
apptDate DoctorTan m/2020 12 11
Expected: Prints outInvalid command format!message followed by a reminder
Doctor’s names should only contain spaces and/or alphanumeric characters

Special characters like . ! @ # , etc are not allowed!

Please re-enter with an appropriate doctor name. -
Test case 5:
apptDate DoctorTan m/2019 12 11
Expected:This is your Appointment timetable for the date: 2019-12-11message followed by timeline
Shawn, Xiao ming and John should appear in the timeline, following that that order. -
Test case 6:
apptDate DoctorTan m/2020 12 11
Expected:This is your Appointment timetable for the date: 2019-12-11message followed by timeline
Only Kumar should appear in the timeline at the 11:30 time-slot.
-